Up next in 10

Subscribe: https://bit.ly/28Kc0Cd
⏩More Info: ⏪
Like us on Facebook: https://www.facebook.com/theheartysoul
Website: http://theheartysoul.com
Show More Show Less View Video Transcript
0:00
Hey everybody, Chef Trevor here, and today we're going to do something a little bit different
0:03
A little bit naughty, a little bit not what you're used to, and a little bit of three
0:07
dishes in one episode. Appetizer, main course, and dessert. And I'm calling it Trevor's Three-Way with Apples
0:30
So, apples. There's lots of different ones in the world. There's green ones, there's red ones, there's yellow ones, and hey, who knows
0:42
There could even be a blue one out there. But the idea today is we're going to use apples in three different dishes
0:48
We are going to make an appetizer, we are going to make a main course, and we are of course going to start with dessert
0:54
Because why would you do it any other way when you're having a three-way? You want to start with the sweetest stuff first, right
0:59
So, what I have is Granny Smith apples. I have six of them cut, diced, and just tossed with a little bit of nutmeg and cinnamon
1:07
Two classic spices that go really well with apples, contrary to everything that I've always
1:12
told you is I've just rough chopped these apples as crazy as I want them to
1:16
Because all we're going to do is stuff them in the middle of a pie crust, okay
1:20
To keep things easy, because we want to make three dishes in a short period of time, I've
1:24
just went to the store and I bought a pre-bought gluten-free pie shell
1:29
Normally they come with two in one. You want to make sure that you take one and leave it in the pan, and the other one we
1:35
just remove and flatten onto a tray, okay? And you want to work with a gluten-free crust here so that way we leave flour out of the equation
1:44
To get our apples ready for the pie, we need to add one cup of coconut sugar
1:49
And I use coconut sugar because it's an unrefined alternative to regular white sugar, and it
1:53
actually offers a really unique flavor, much like brown sugar would. And when you put apples in the oven and you add heat to them, they start to release moisture
2:02
Things get all hot and bothered. So to keep that from happening, we're just going to add a little bit of tapioca starch
2:08
in there, just to kind of keep everything combined together when those apples start
2:13
to cook. And then all you want to do is with your hands, get a little bit messy and mix those apples
2:19
and coconut sugar and tapioca starch around. We want everything to get nicely and evenly coated before we put those apples into the
2:28
pie shelf. Okay? And so once you're done, everything should kind of look just like that, nicely coated
2:34
and we're just going to go right into the pie shelf. Now you're going to look like you got way too much apples to start with, and that's
2:40
okay because they're going to cook down as the pie cooks. So you just want to kind of get those in there
2:47
And if you're left with a little leftover apples, no problem. The best thing that I always do is I'll take them, I'll put them in a pot, and I'll just
2:54
cook them down until they make applesauce, and then I have an awesome dessert for the
2:58
next day. And then we're going to take our top crust, and we're going to lay it over top
3:08
Now, if you get some of this beautiful, candied, sugary stuff on the top of the pie crust
3:15
not to worry at all. It's only going to add to the rustic appeal and flavor of that pie when you take it out
3:21
of the oven. So all I'm doing is I'm just pinching down the edges of the top crust onto the bottom crust
3:29
And I just want to make sure before I go into the oven that I've pressed down all along
3:33
the sides here to make sure that I've sealed that top crust to that bottom crust
3:38
If you have a few cracks or tears, that's okay because we do need a space for the steam
3:43
to escape. And just to help that process, all I'm going to do is cut three little slits into the very
3:49
top of this pie so we don't end up with that soggy piece of crust underneath between the
3:56
apples and the crust. And we are ready to go to the oven
4:05
All right, our pie is in the oven, and now let's get to our second course
4:09
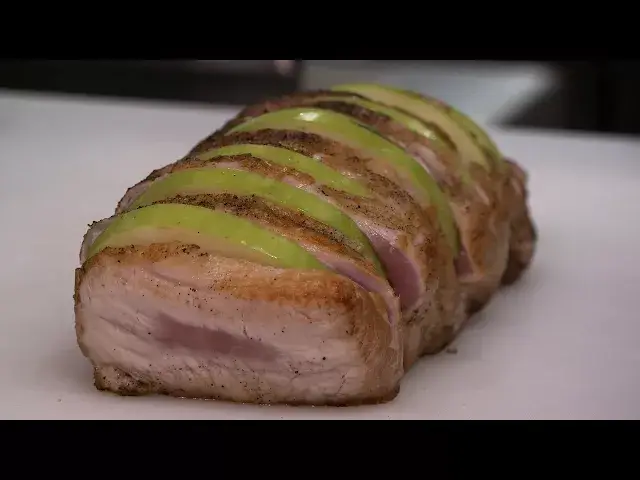
Today I have two pounds of boneless pork loin. So what's happened is the rib bones have been taken off the pork loin and it's been
4:16
tied and trussed for us. And what you're looking for when you're looking for pork is no discoloration, a very nice
4:21
red pinky looking flesh, nothing too pale and gray. For that, we're just going to keep it nicely tied, and all we're going to do is season
4:29
it with some salt and pepper. And I'm using sea salt today. And the one trick you need to know about sea salt is it's very, very salty
4:37
You use a little bit less than you would use if you're using regular old table salt
4:42
So I'm just going to season generously both sides of my pork with some salt and pepper
4:52
Once you've generally seasoned nice and generously both sides of your pork loin, you are ready
4:57
to do the first step, which is giving this a nice golden brown sear
5:02
So the first step to any three-way is obviously looking sexy, and that's what we want to do
5:06
with this pork today. We want to give it a really nice, crispy, golden brown outside
5:11
So I'm going to go into my pan with a generous amount of coconut oil, because we do want
5:15
to start searing the outside. And I'm going to turn that heat up to quite high
5:19
We want it to be smoking hot. So when we're getting ready for a sear, we know we're ready when that oil is about to
5:25
hit its smoke point. And we are there, and we are going to go with our presentation side down first
5:41
All right. Once you've got a beautiful golden brown on all sides of your pork, you are ready to
5:49
transfer it from your coconut oil into our roasting pan. And all I have on my roasting pan here is on the bottom
5:56
I've just got a little bit of parchment paper, just so nothing sticks. And I just want to set that pork in there and let it rest for a minute while we continue
6:03
with the preparation. We're just going to make some slits right in the pork, just like so
6:09
And this seems like a bit of a weird process. You know, why did we sear this meat on the outside just to cut these slits in it now
6:16
And the reality is, is we wanted to start the flavor process of the pork, because we're
6:19
going to be roasting it in the oven. We wanted to start getting that crispy, delicious, caramelized outside
6:27
What we're doing now is actually creating a way to enhance flavor
6:31
So all I want to do is take one nice side of my apple here, and I just want to make
6:36
some slices, exactly like how we just put those slices into the pork
6:42
And all we're going to do is take that apple, and we're just going to shove it into those places
6:47
And this is just because we don't have a lot of time like we would with beef to allow a lot of flavor to penetrate into the meat now
6:53
We're actually going to get that flavor in by doing this little process
6:57
So we're just going to transform back into our roasting pan with that piece of pork
7:02
And we're going to take the remaining apples. And you can leave the skin on at this point
7:06
All we're going to do is take the core off. And all we're doing is one, two, three, four motion, and all we're really losing is the
7:15
core of the apple. And at this point, we're just doing a rough chop, okay
7:19
Because these are going to act as the garnish for our dish afterwards
7:23
And they are just going to act as flavor enhancers as well to our sauce that's going to create
7:29
itself as this pork roasts. So we're going to get them into our roasting pan
7:35
And then what I like to do is kind of just give them a little swizzle on the bottom and
7:39
set that pork right on top so now that that pork is roasting all the way around
7:44
It's not sitting in any liquid or sitting on the bottom of that pan
7:48
And we're just going to continue and keep cutting our apples. This is the one place where you can be as rough as you like and they don't all have
7:58
to be the same size. Next, for another bit of flavor, we're just going to add in one red onion
8:06
Super sweet, super delicious, and it's just going to help enhance that sauce
8:11
And again, just be rough with that onion. You don't need to be specific. You don't need to be gentle with it
8:18
Next step is totally optional and completely up to you. You can add one quarter of a cup of liquid honey
8:25
I'm using organic honey from Niagara College's own apiary today. And all I want to add that honey for is just a little bit more residual sweetness because
8:33
those apples, those Granny Smith apples, are a little bit more tart in flavor than something
8:39
like a Red Delicious or a Crispin or a Mutsu apple. So I'm just adding that honey just to kind of balance out the sourness from those apples
8:48
And to help out that pork and that apple flavor, another really good lover of pork and apple
8:54
is cinnamon. Some people almost say that cinnamon, pork, and apples could have their own three-way
8:59
And so today, I'm just going to drizzle that right on top. And then one final step before we're ready to go in the oven
9:05
We need a little bit of moisture in here to create that roasting environment inside of here
9:10
So I've just got one cup of chicken stock just going into the bottom of that roasting pan
9:17
Just like that, we're going to take foil, close up our pork, and say goodbye to it for
9:24
about 50 minutes in a 350 degree oven. So much like a three-way, we've done the sweet part, the making out's all good
9:35
Then we got to the heavy stuff and the main course is in the oven. Now we're going to finish off with the light, heavy petting, if you will
9:41
We're going to finish with our soup, okay? And our soup has apples in it as well
9:47
And they are going to pair deliciously with parsnips today. We are going to make a parsnip and apple soup with a little bit of an Asian influence to
9:54
You're working with parsnips almost exactly like carrots. So what we want to do is take them and just peel them and get rid of that first layer
10:03
of woody, dirty skin. Then once you've got all our parsnips peeled, we're just going to take the tops and the
10:14
bottoms and we're going to cut them up. Then once our parsnips are dealt with, we are going to take our two apples and we are
10:21
going to do exactly the same thing. We are going to peel the apple. You got one of those unsightly brown apples in the fridge that you just don't want to
10:28
eat because you don't eat apples that have brown spots on them. You can use them in your soup and you can still get their value and their flavor without
10:35
having to throw them in the garbage because who wants to bite into a brown spot
10:42
The reality of that situation is that's just a reaction occurring with the flesh of the
10:46
apple and the air around you. And it's called an oxidation reaction
10:51
It's basically the same thing that happens when rust occurs. It does not transform the flavor of the apple
10:57
It just makes it look brown. That's okay. Now, the best thing about today's soup is it's a wham bam thank you man soup
11:04
Everything in one pot, everything in one step, super fast, super quick
11:09
And the even better part about it is I'm telling you to be rough today. Be rough with your cuts
11:14
Don't be precise. Don't take the time to make them all look the same size
11:19
Be rough with it. After all, we're having a three-way with apples today
11:23
We should get a little rough with them, don't you think? The idea here is we just want all the pieces nice and small so that they all cook at a
11:31
relatively quick rate. Same thing with the parsnips. We just want to give them a nice rough chop
11:40
So you're just cutting the parsnips nice and thin so that way they cook quickly and they
11:45
turn into a mush really fast, almost how fast the apples are going to turn into like an
11:49
applesauce consistency. The parsnips are going to do the same thing. Once you've got your parsnips all roughly chopped, you can go ahead and add those into
11:59
the pot alongside our apples. And of course, because we can't ever do anything without the flavor of an onion, I'm going
12:06
to put one onion in this soup. Again, you guessed it, everything's being pureed so we are going to rough chop that
12:13
onion in small enough pieces that its flavor penetrates all the way through the soup
12:21
To finish off, for fragrance and for a little bit of, what is that
12:27
I'm going to add some ginger. Ginger lends itself very well to apples as well because its spicy sweet notes complement
12:35
the flavor of apple really well. So a lot of times you will often see apple and ginger go together just as much as you
12:41
see apple and cinnamon go together. I've also got, for a little bit of a more Asian feel to it, a little bit of garam masala
12:48
which is an aromatic blend of spices used most often times in Indian cooking
12:53
Today, it's just going to give us a little bit of earthy fragrance that's going to help
12:57
pull out the flavors of the apples. So I've got two teaspoons of that, one teaspoon of cumin, and two cloves of chopped garlic
13:07
I've also got 750 milliliters of vegetable stock that we're just going to use to kind
13:14
of help start the moistening process of those vegetables and get them nice and soft so they
13:18
can be pureed. And then finally, one half cup of coconut milk
13:24
I'm using organic coconut milk today which looks a little bit more chunky and not as
13:27
smooth as what you're used to, but believe me, the organic coconut milk has ten times
13:33
more flavor and you're going to want to use it from now on. Once you've got all those ingredients together in a pot, you can transfer it to the heat
13:41
and turn it on to medium high. And what you want is everything to kind of start simmering together
13:46
And in about 35 to 40 minutes, we're going to be able to come back to this soup and puree
13:50
it and it'll be ready to serve. It's been about 45 minutes, almost an hour, and we're about to take our pie out of the oven
14:03
And I have to warn you, it looks so delicious, you will probably make it to third base with
14:07
this pie. So we're just going to leave it out now. We want to let it rest for about 30 to 40 minutes until we cut it
14:15
If we cut it right now, all that hot molten sugar and hot apple is going to ooze out the
14:20
side and it's going to make a really watery filling. So what we want to do is give that time to that pie, let it cool a little bit, and then
14:27
when we cut into it, it's going to be solidified, the filling's going to be nicely gelled together
14:31
the sugar's going to be cooled down to a nice syrupy, almost honey-like consistency
14:37
And that's what we're looking for when we cut into the pie. Don't get premature here, don't get too excited, wait that 30 to 40 minutes or else the results
14:46
will not be what you want. All right, it's been about 25 minutes and we're about to get to the next step of our
14:50
soup right before we're about to serve it. This soup here lends itself very well to being pureed, nice and smooth, nice and silky, like
14:57
some really awesome lingerie. But today, we're going to puree this soup because we want the flavour, not because we
15:04
want it to look really good, we want the flavour of everything to be all mixed together and
15:08
pureed nicely into a velvety, sexy appeal of a soup on the mouth
15:14
If we were to just leave everything like this, we would have a chunk of apple, we'd have a chunk of onion, we'd have a chunk of parsnip, nothing would be harmonious and nothing would
15:21
taste like one unified soup. So in order to make that happen, just before we're finished, when everything is nice and
15:28
soft and it's just come together, we're going to actually blend that soup, okay
15:33
It's going to be quite loud so I'm not going to be talking through it, but we do need to
15:37
work in batches because we don't want to overdo the blender. When you're blending a soup, if you're using an immersion blender or a hand blender, you're
15:50
going to want to use a taller, narrower pot because the actual effect of the immersion
15:55
blender is to be immersed inside the liquid. A lot of times people use an immersion blender and they think this thing is a piece of crap
16:02
because it's not working. The reality is they're using too wide and shallow of a pot
16:06
They need to be using a more narrower and taller pot. Another thing when you're blending, you want to make sure you've got a good ratio of liquid
16:14
to fibrous product in the blender and you never want to fill the blender all the way full
16:20
So I'm going to go probably about one more ladle in there
16:28
And of course when you're blending something, especially if you want it smooth and silky
16:33
you want to make sure you're going with something with a lot of horsepower, something with a big motor, something that's got lots of power because the last thing you want is halfway
16:41
through you blending your soup, that blender cuts out. It's one of those places where you just can't cheap out on a good vibrator
16:48
The only thing left to do to this is bring it back to the heat, bring it to a nice simmer
16:53
and taste the seasoning. So all we're going to do is put that back into our pan and if you've done your job right
16:59
and you've taken your time, you should have a very nice silky smooth puree going back
17:05
into that pot with no chunks or no unsightly pieces of apple or onion or parsnip left in there
17:13
You should have one nice smooth soup. At this point we want to reduce the heat to as low as possible because now that all of
17:21
those ingredients are pureed, they have way more surface area which means they're going
17:26
to be way more likely to stick to the bottom of that pot. So you want to use a low and gentle heat to finish off the soup
17:33
So now that the soup is back on the heat, we just want to taste it for seasoning because
17:38
we've pureed all the goodness that we put into that pot into this soup so there should
17:42
be lots of flavor there but we just want to balance out the salt and pepper to make
17:46
sure that all of the seasoning and all of the flavors are coming together nice
17:51
To me that soup is really really good. We've got the tartness from the apples coming through, we've also got that really elegant
18:00
sweetness from the parsnips adding to that tart apple flavor. The only thing that I want to do at this point is I just want to add myself about one tablespoon
18:09
more of sea salt and I'm going to go in and finish with just a little bit, almost a teaspoon
18:15
of white pepper. And the white pepper in this case, just because we've already pureed the soup, we've already
18:20
got this appeal of it looking nice and light and white, we don't want to bog that down
18:25
by adding flecks of black pepper in there. So we keep the white pepper in there so things stay a little bit whiter
18:30
Now here's the trick that most people often forget when they're tasting and seasoning
18:34
is they'll taste and then they won't like it and they'll adjust the seasoning and then they'll serve it
18:39
But they don't ever taste it again after that initial season. Now you need to understand the difference, right
18:46
I've got the salt and the pepper in there now and now there's a balance happening between
18:51
the parsnips and between the apples. Their flavors aren't separate or distinct anymore, their flavors are actually harmonious
18:57
they marry together very well, almost like they're making love to each other in that pot
19:03
And that's what we want when we're making a soup, is all of the flavors to melt together
19:07
and become one, okay? And that's what balancing and adjusting the seasoning does
19:12
We've made all of the flavors in that pot taste like one delicious dish now instead
19:17
of separate ingredients. And with that, your soup can simmer here for as long as you like, it can be taken off the
19:24
stove and transformed into a refrigerator container and kept in the fridge for up to
19:29
one week, or it can become the appetizer to your dinner party this evening
19:33
So we're just going to leave that on to simmer while we finish off our pork. Alright, so it's been about 45-50 minutes, we're about ready to take our pork out of
19:45
the oven. Okay, so I'm just going to take it out and I'm going to do a little cook secret while
19:51
I work with the sauce and the garnish. Okay, and what we're going to do is we're going to take that lid and we're just going
19:59
to give it kind of a unique little crumple like so, and we are going to let that pork
20:04
out of its liquid here, and we're going to let that pork kind of just sit nicely on that
20:10
foil for a few minutes. And what that is doing is it's actually acting as almost like a natural resting rack, if
20:17
you will. So the juices in this meat, while it's resting there, while we're finishing this sauce, it's
20:23
going to sit and all the juices are going to redistribute through the meat and it's
20:27
going to be super moist and delicious. And I really have to emphasize the fact that this pork will be very moist
20:36
So what we want to do while that is resting is we want to just give these fun ingredients
20:41
just a little bit of work in a frying pan. So in the bottom here we've got the makings of one awesome pork sauce and all we need
20:49
to do to finish it is just bring it to a simmer in a frying pan. So all we're going to do is dump all that in there nicely, and we're just going to turn
20:59
that on to a medium heat, and we're just going to let that simmer, we're going to season
21:03
it and we're going to serve it as the accompaniment to our pork when we put it on the tray
21:07
And the reason we're bringing this to a simmer is because we don't want any of the pork liquid
21:12
to be potentially not at the right temperature. So we're bringing this to a boil just to make sure we're cooking off or killing any excess
21:19
bacteria that might have existed in that liquid. And the best part about this right now is you're almost making a home-style rustic applesauce
21:27
So your guests are going to get this onion, they're going to get the flavor of the cinnamon
21:31
they're going to get the honey, and then they're going to take a little bit of that apple and they're going to mush it in with the pork and it's just going to be this amazing melt-in-your-mouth
21:39
flavor that you just wouldn't have gotten if you were barbecuing or pan searing this
21:44
So once that's kind of tightened up a bit and it looks just like that, remember it's
21:47
not going to be the most glamorous thing in the whole world, but we've just got everything
21:51
coming together, we're done and our sauce is finished. So... And then we're going to take our pork
22:08
You have to remember that we do have all of that threading on here that we need to take off
22:22
Once you've removed all the string, the process is simple. You just want to make straight down cuts following the cuts where you sliced in the apple
22:41
And you know you've done your job right if when you're slicing this pork you don't have
22:45
a massive liquid pool on the cutting board with you. That means all of the juices have rested and put themselves back into the meat before
22:53
you started slicing. And then what you're going to do is with one brave motion, you're just going to transfer
22:58
that from your cutting board to your serving vessel and then because we have a little bit
23:04
of it left, we're just going to get a little bit of that caramelized applesauce and get
23:11
a little bit of that happening on there. The majority of it we have of course in the bowls on the side
23:19
And there you have it, apple cinnamon roasted pork with accompaniments. Well, here I am by the fire recovering
23:37
I have parsnip and apple soup, I have roasted loin of pork with apple and cinnamon and I
23:43
have a wonderful gluten free apple pie. I hope all of this was as good for you as it was for me
23:48
That concludes my apple three way. I'll see you next time on Cooking with Trevor
#Cooking & Recipes
#Food
#Kitchen & Dining
#Cookware & Diningware
#Small Kitchen Appliances
#Culinary Training